How to Create a Shadow Study with SketchUp and Photoshop

This tutorial will show you how to create a shadow / butterfly diagram using SketchUp and Photoshop.
Software Required: SketchUp, Adobe Photoshop or other image editor.
Expected Time: 15 Minutes
Difficult: Moderate
Step 1
Decide on the time interval in which the study will be conducted over. In my example, I’m doing 9 am – 5 pm, with a shot at every hour. The shorter the interval, the more seamless the transitions will be from one shadow to the next.
Step 2
Set up the view you’d like for the study. The view I choose was a top down perspective, but any view that clearly shows the area you want to study is fine. The important point is that the view should not be moved from one saved image to the next.
 Step 3
Save your views as image over the chosen interval. I rendered my SketchUp model with VRay, and saved nine images to be compiled in Photoshop.
Step 4
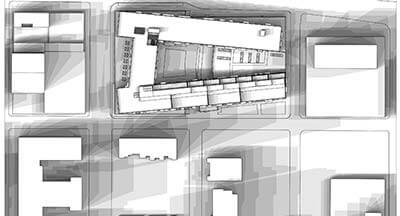
Bring all of your images into Photoshop, so they’re layered on top of each other, with the latest time being the highest layer. Ensure that there is a layer with a white fill at the bottom. Now select all of the shadow layers and set the blend mode to multiply, and lower the opacity to somewhere between 30 and 50% to get the look you want. I used 40% in my example.
Step 5
 Now, the image is looking good, but a level or curves adjustment might be needed if the image is too light or dark. I also added a hue/saturation level and lowered the saturation so the image wasn’t so blue. This was because the VRay renders had a blue tint to them, but your images will vary.
That’s all there is too it. Play around with these settings and the amount of shadow images used to get different results.
You might also like