As is the case with most renders from a 3D model, the exported product is very realistic in terms of lighting and shadows, but to truly bring the render to life, you’ll want to improve it by adding a background, people, objects, and vegetation. You may be able to model some of these elements into the model, but it’s best to add them in later in Photoshop.
Background
Adding a background different than the default one from the render is a great way to add realism to the scene. You can either add in ground and sky, ground, or just sky. When placing a background into your render, there is usually two different ways in which this can be done. The first is where the model sits in front of the background, and the second is where the model sits on the background. See below for an explanation.

Behind: Either part of the ground has been 3D modeled and is in the render, or the angle of the camera is looking up towards the sky so the ground isn’t showing.

On Top: The 3D model does not include and ground surface, so you’ll have to find a background that can “hold” the model.
Before placing a background into your render, make sure that you have some transparent areas in your image so the background will show through. Some rendering programs allow you to save the image without a background – this makes this part of the process easier. Using an existing photo or one of your own photos from a site is the most common method, but when you can’t find a suitable photo from the right perspective, it is possible to use Google Earth to obtain an image from an angle that would otherwise be impossible in the real world.

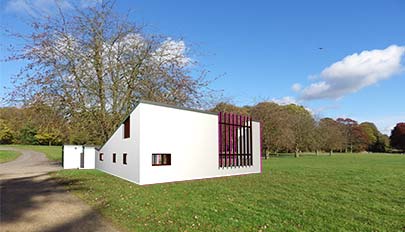
Google Earth background with separate sky that sits behind the model

Google Earth background that the model sits on top of.
When searching for a suitable background image, perspective and scale is the critical element that will make the image work with the render.
Most 3D modeling programs have cameras or views with an adjustable field of view (angle of the visible view). Think of it as a wide angle vs. telescopic lens on a camera. Try to match the field of view of the model with that of the photo. This is especially important when you’re trying to find a photo that the model will site on top of.
When positioning the background image, it is very important to vertically match the vanishing point of the model with the horizon line of the photo. To do this, pick two parallel lines in the model and draw a guideline over them, extending the line towards the vanishing point. The point where the lines intersect is where the horizon should be. Here’s a link to a more detailed tutorial.

Perspective of model fits with the horizon line.

Perspective of model doesn’t fit with the horizon line.
Finally, the scale of the model must agree with its surrounding. Use elements in the background with a known size and compare them to the size of the model. Move the model around to different areas and scale it up and down until it looks right.

The model is scaled correctly with the environment.
The model is scaled incorrectly with the environment.
People & Objects
People and objects bring scale into the scene, showing the viewer how big your model is compared to the human body. Just as with backgrounds, matching the perspective of the person with the place they are put into the scene is important. Placing people is a bit more flexible than other objects since their lack of perpendicular and parallel lines makes it harder to tell if their perspectives matches the scene. Pay attention to where the person is going to be placed; whether they will be viewed from above, below, or head on, and also if they’re facing forwards, left, or right. Don’t forget to add shadows to your objects that match the existing shadow and sun conditions in your image. Here’s a good tutorial on creating realistic shadows in Photoshop on Shoogledesigns.com.

In the above scene, the shadows on the man and the trees are added in, and match the shadows from the structure.
Here’s a bunch of links to some of the best sites to get images of people and objects.
- Skalgubbar.se
- Immediatentourage.com
- Gobotree.com
- Mrcutout.com
- Free stuff – Viz-people.com
- Architecturepeople.com
- Greenscreen people volume 1 – xoio.com
- Greenscreen people volume 2 – xoio.com
- Greenscreen from below – xoio.com
- Cutout people – Office and interaction – xoio.com
- Freebies – Ronenbekerman.com
- Free stuff – Easy3dsource.com
Vegetation
Vegetation allows you to be even more flexible in its placement since most trees, bushes, and grass looks almost the same no matter which side you’re looking at. The key to make vegetation look realistic is through overlapping and randomness. You can use the same tree several times as long as you scale it to different sizes and overlap them. This is especially true when it comes to grass. I have a separate tutorial about adding grass to a render, called Adding Realistic Grass to Renders.

Multiple grass images overlapping.
Image: Andrew Shea

Painted on grass.

An entire image of grass is used here.
Don’t forget that vegetation cast shadows too. For simple shapes, use the brush tool to quickly paint in some shadows. For more complex trees, use the same technique for creating shadows for people.
Here are some links to a bunch of good websites with free source materials.