This tutorial will show you how to create axonometric floor plans in Revit, and then color code them using Adobe Illustrator.
Software Required: Revit, Adobe Illustrator
Time Required: 15-30 Minutes
Difficulty: Intermediate
Crop the View
Open up the default 3D view or another 3D orthographic view of your choosing. Turn on the section box, and use the grab handles to laterally and vertically adjust the box. To cut through one floor, the bottom of the box should be just below the floor plate, and the top should be just below the floor above. The position of the section box in this tutorial can be seen in figure 2, and the resulting cut in figure 3.

Figure 1: Starting 3D View

Figure 2: Location of section box outlined in blue.

Figure 3: Section cut through second floor.
Adjust View Appearance
Now that the view is cropped, it’s time to adjust the view appearance so that it reads better. This is largely determined by the size of the building / scale of the view. In this example, the building is large, with many of the detailed elements being lost in the linework. In the image above, there is a section of ceiling that should be hidden, and the shaded view isn’t helping the plan to read better. Open up the Visibility/Graphics Overrides and turn off any model category that is cluttering up the view. After cleaning up this model, the only categories that remained on were curtain walls, doors, floors, roofs, shaft openings, structural columns, walls and windows. In addition, the view style was set to hidden line, as color overlays will be added later on. The cleaned up floor plan is shown in figure 4.

Figure 4: Cleaned up floor plan.
Further adjustments include setting the floor surface pattern to solid white, changing the view to course, and setting the cut pattern of any element being cut through to solid black. Other techniques that help the floor plan to read better include using shadows (figure 5), or coloring the walls a solid color (figure 6).

Figure 5: Axon floor plan with shadows.

Figure 6: Axon floor plan with solid gray walls.
Revit currently doesn’t support color schemes (color overlays on floor plans) in 3D views, so the view will be exported out and the color overlays done in Illustrator. There are other methods for achieving similar results, some of which can be found in this Autodesk blog post. With more effort, Dynamo can be used to create colored surfaces on top of floors.
Export the Floor Plan View
Next, export the 3D orthographic view as an image or PDF. If the drawing style is hidden line without any shadows, the view can be printed as a vector PDF. If the view style is hidden line or has shadows or smooth lines with anti-aliasing turned on, the output will be a raster image. It is recommended to export to a high resolution TIFF file for raster images. The image used for this tutorial was saved as a 5,000 pixel wide TIFF file.
Color Overlays
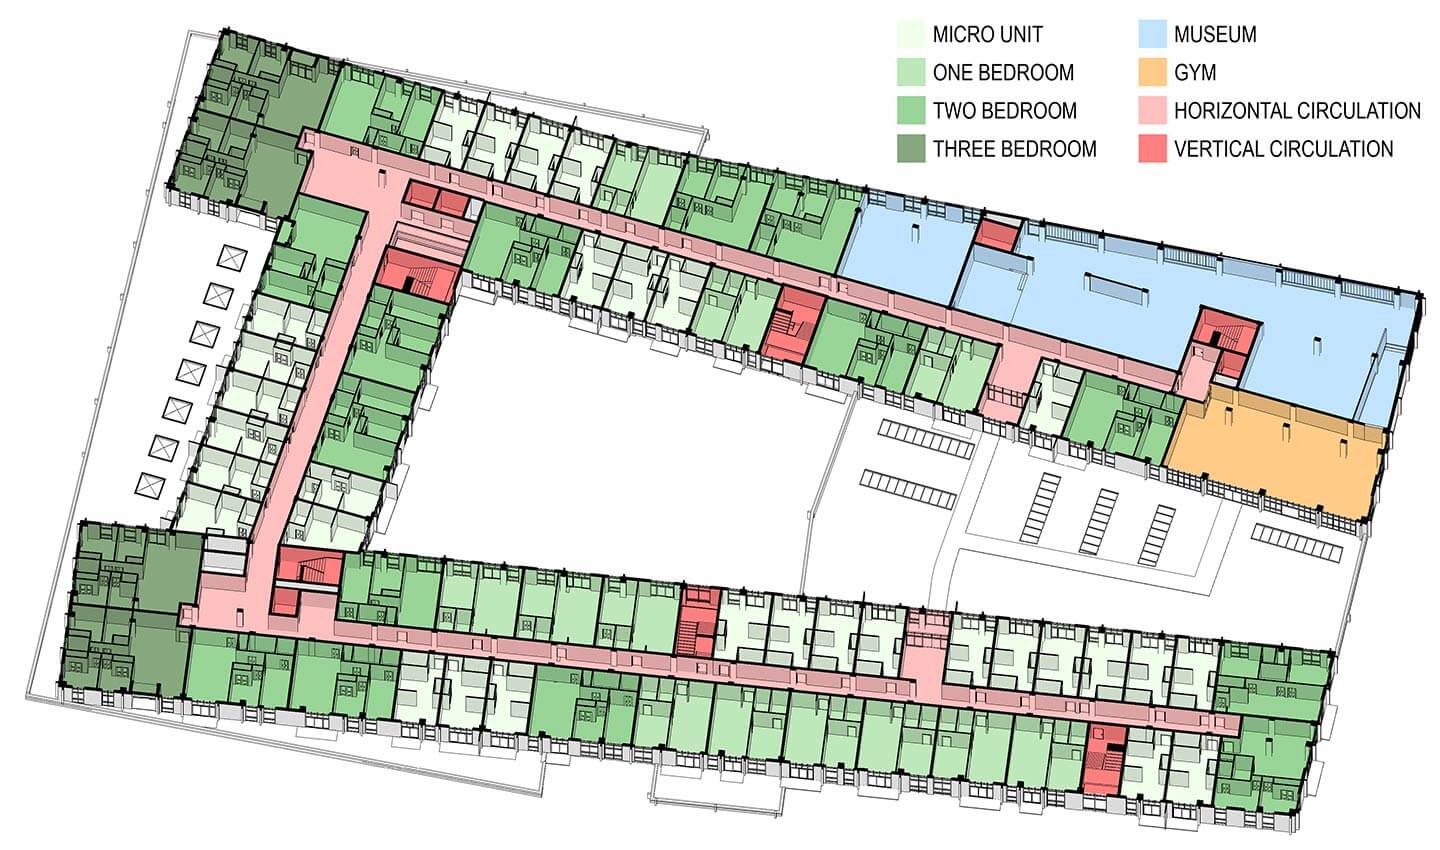
Bring the image or PDF into Illustrator and use the pen tool to trace around the rooms in the floor plan. Use a transparent stroke and colored fill, while using the blending mode and transparency to reveal the plan underneath. In this tutorial, all the color overlays were placed in a separate layer with the blending mode set to multiply, and the opacity set to 50%. The floor plan with color overlays and a legend can be seen in figure 7.
Figure 7: Floor plan with colored overlays and legend.